Sidebar
publishing_to_apple_itunes_connect
Table of Contents
Publishing to Apple iTunes Connect
At a high level, publishing your ViziApps app through the Apple App Store is a three-step process:
- Create what people will see in the App Store with iTunes Connect
- Brand and build the code for your ViziApps app
- Deploy your app to iTunes Connect with Application Loader.
This document takes you through all the detailed steps. The information and methodology regarding iTunes Connect can change often, so be sure to download and refer to the iTunes Connect Developer Guide for the latest information.
Set Up Your App Record on iTunes Connect
Using the Team Agent account, log in to the iTunes Connect website (https://itunesconnect.apple.com) and follow these steps to create a record of your app. The record is what either Application Loader will deploy the compiled binary to.
- Go to the Manage Your Applications section.
- Within the Manage Your Apps interface, press the Add New App button.
- If this is the first app you have ever submitted with this iOS Developer Program account, you will be directed to the New Application interface; otherwise skip to step 4. You will be asked to select a primary language, and your organization’s name as it should appear on the App Store. The information that you provide here is global for all apps you will develop for the App Store and your answers cannot be changed. Press Continue when done.

- Primary Language: What language will you be using to communicate the details of your app to Apple? The choice you enter here is also the language in which the details of your app will be displayed on the App Store for all your apps.
- Company Name: Enter the name of your Company/Organization as you want it to appear on the App Store for all your apps. If you are deploying apps as an Individual, enter your name as you wish to be identified on the App Store.
- For the App Information interface, fill in the following fields and press Continue when done.
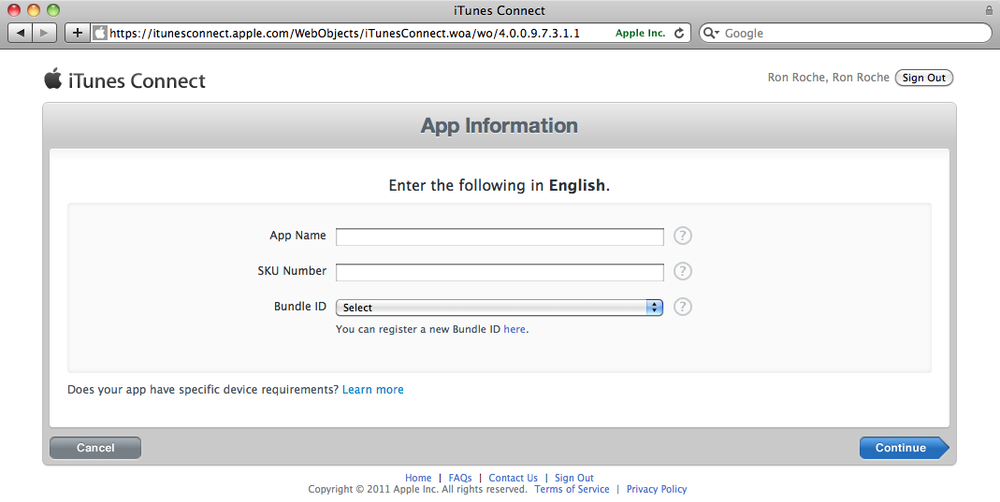
- App Name: Enter the name for your app as it will be listed on the App Store. Your app name must be unique on the App Store, and it cannot be longer than 255 characters.
- SKU Number: Enter a number used to identify this release of your app. It is entirely up to you what you want to put here. A release number such as “2.4” is a common identifier. This field is not visible to customers.
- Bundle ID: Select the App ID associated with your app. If you select a wildcard Bundle ID, you will be asked to provide a “Bundle ID Suffix.” The suffix will replace the asterisk in the Bundle ID when the app record is created.
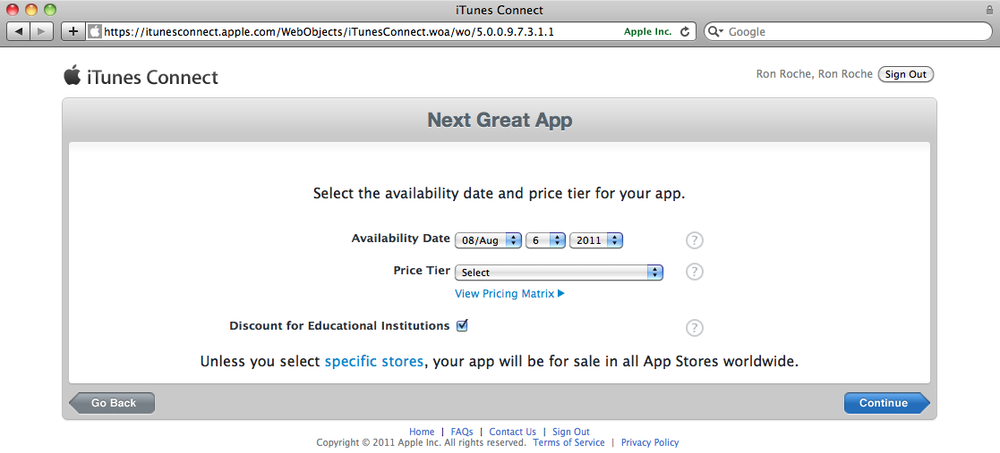
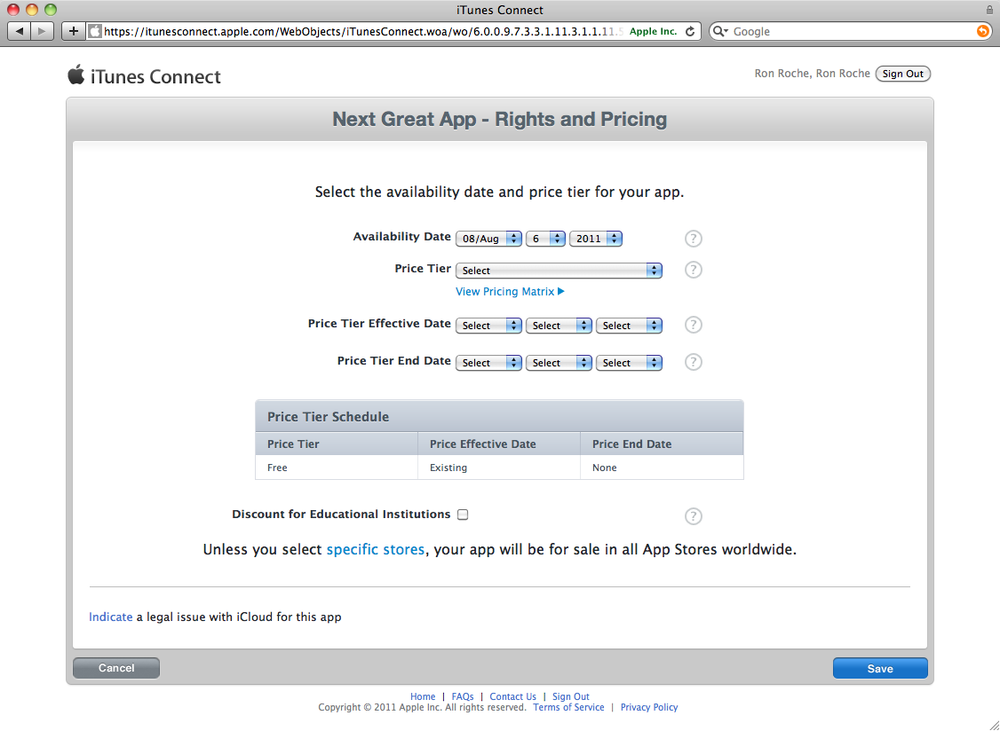
- You will be asked to set an Availability Date and Price Tier for your app. The Availability Date is the date in which you would like your app to appear on the App Store. If you would like your app posted to the App Store for download as soon as the review process is complete, set the availability date to today. If your app is going to be free, set the Price Tier to Free, otherwise review the pricing matrix using the View Pricing Matrix link to set the price of your app. Press Continue when done.

- The next screen requires you to supply the metadata for your app. Unless noted otherwise, all fields are required. Go to the App Store and view how a few different apps are annotated. This will give you a better picture for how the information that you fill in here will ultimately be displayed. Apple does not check what is entered here for spelling or grammar; be diligent when filling out these fields.

- Version Number: Enter the software version number as you want it to appear on the App Store to your customers. For example, 2.3.4 or 2.1.
- Description: Enter the description of your app as it will appear on the App Store directly below your app’s title. The Description field must be at least 10 characters in length and you are limited to 4,000 characters.
- Primary Category: Select a category that best describes your app.
- Secondary Category: (optional) Select a secondary category that best describes your app.
- Keywords: Fill in a list of keywords that best describe your app. These keywords will be referenced when customers are searching the App Store. This field is limited to 100 characters.
- Copyright: Specify the name of the person or organization that owns the rights to your app. For example, “Tom Hacker” or “2000 Acme Corporation, Inc.”
- Contact Email Address: Fill in the email address Apple will use to contact you during the review process. This email address is not posted to the App Store.
- Support URL: Enter the URL customers can use to get support or information about your app. This URL will be posted on the App Store within the details of your app.
- App URL: (optional) This is an optional field that will be published to the App Store for customers to get more information about your app.
- Review Notes: (optional) Fill in the details that you want to send to Apple regarding your app to help with the review process (instructions, demo information, usernames, passwords, etc.). The data in this field is not posted to the App Store. This field is limited to 4,000 characters.
- Fill in the Rating information as it applies to your app.
- Use either the standard End User License Agreement or use this interface to upload your own. If you upload your own EULA, you will have to select the countries in which your EULA applies. For all other countries, the standard EULA applies.
- Use the Uploads section to brand your app. You must upload a large 512×512 pixel icon and at least one screenshot.
- Large 512×512 icon: Upload an app icon identical to the icon file used for your app that is 512×512 pixels in size and a minimum of 72dpi. Do not “round” the corners; Apple will take care of that.
- iPhone and iPod touch Screenshots: Upload up to five iPhone/iPod touch screenshots here. The order in which they are uploaded does not matter, but make sure your primary screenshot is leftmost; you can drag and drop the images to change the order once you have all of them uploaded. According to the iTunes Connect website: “iPhone and iPod touch Screenshots must be .jpeg, .jpg, .tif, .tiff, or .png file that is 960×640, 960×600, 640×960, 640×920, 480×320, 480×300, 320×480, or 320×460 pixels, at least 72 DPI, and in the RBG color space.”
- iPad Screenshots: Upload up to five iPad screenshots here. The order in which they are uploaded does not matter, but make sure your primary screenshot is leftmost; you can drag and drop the images to change the order once you have all of them uploaded. According to the iTunes Connect website: “iPad Screenshots must be .jpeg, .jpg, .tif, .tiff, or .png file that is 1024×768, 1024×748, 768×1024, or 768×1004 pixels, at least 72 DPI, and in the RBG color space.”
- Once you save your app information, your app record is created with a status of “Prepare for Upload.”
- When your app is ready to be reviewed by Apple, you can then go into the details of your app and press the “Ready to Upload Binary” button. You will be asked a few questions about export compliance regarding encryption. Once you press Continue, the status of your app will change to “Waiting for Upload.” You can now use Application Loader to upload a ZIP file to iTunes Connect to start the review process.
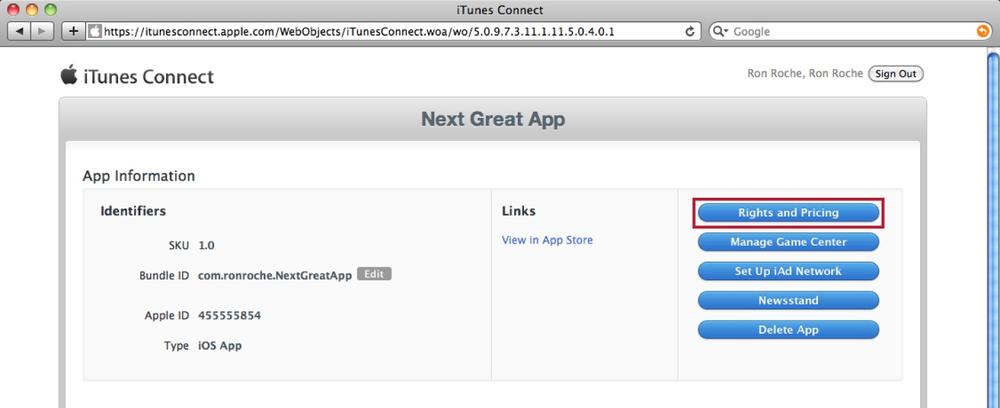
- Now that your app record is created, you can click on the app icon to manage the details of your app. From here you can select “Rights and Pricing” to manage the availability date, price tier, and the countries where you wish your app to be available.


Branding and Building Your App
Follow these instructions for branding your app and creating a code file build that can be uploaded to iTunes Connect: Branding and Building Apps for Publishing
Uploading to iTunes Connect
Install Application Loader
You can use the program Application Loader on your Mac computer to submit your app to iTunes Connect. First install Application Loader:
- Sign in to iTunes Connect.
- Click Manage Your Apps.
- At the bottom of the page, click Download Application Loader.


Upload Your Code File
- Download your code file from ViziApps Studio: Download Your App Build
- Open Application Loader
- Once you agree to the license, you will be prompted for your iOS Dev Center login credentials.
- Note: Application Loader saves your login credentials. To reset your account> settings, use Window menu → “Sign In As…” You may need to do this if you were to change the password for the Team Agent account.
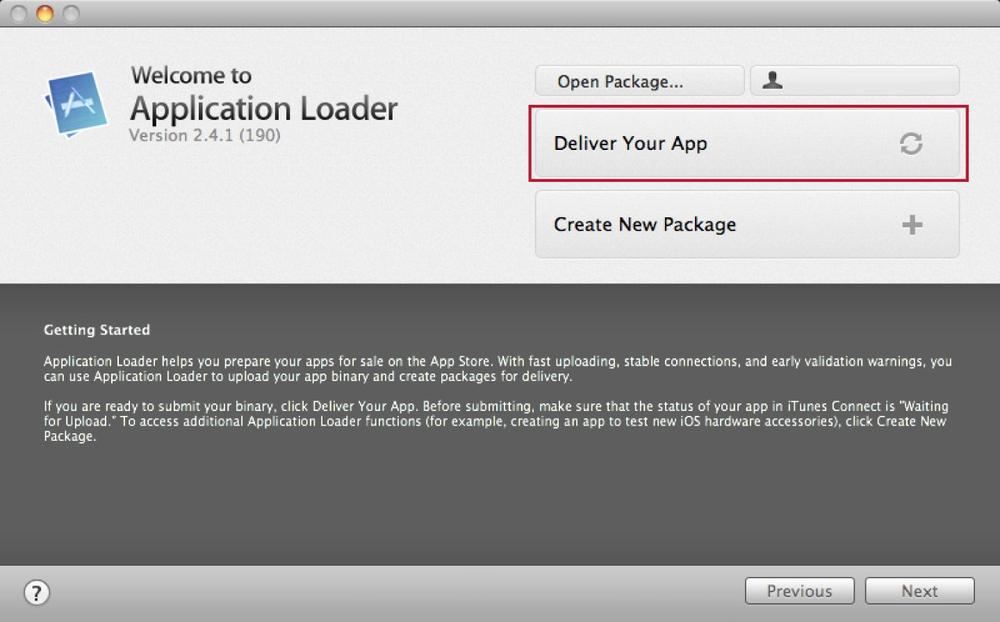
- Press the “Deliver Your App” button
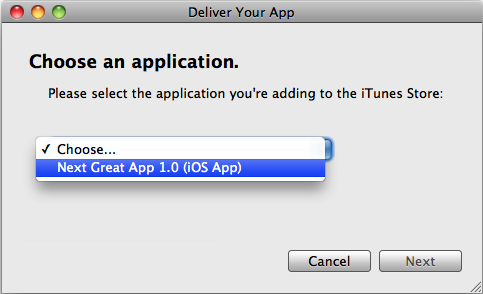
- For the “Choose your Application” dialog box, select your app with the current status of “Waiting for Upload” on iTunes Connect and press Next.

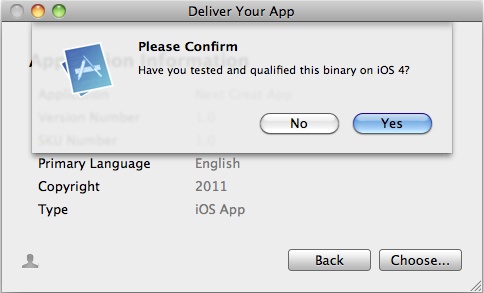
- The next screen asks you to confirm that your app was tested
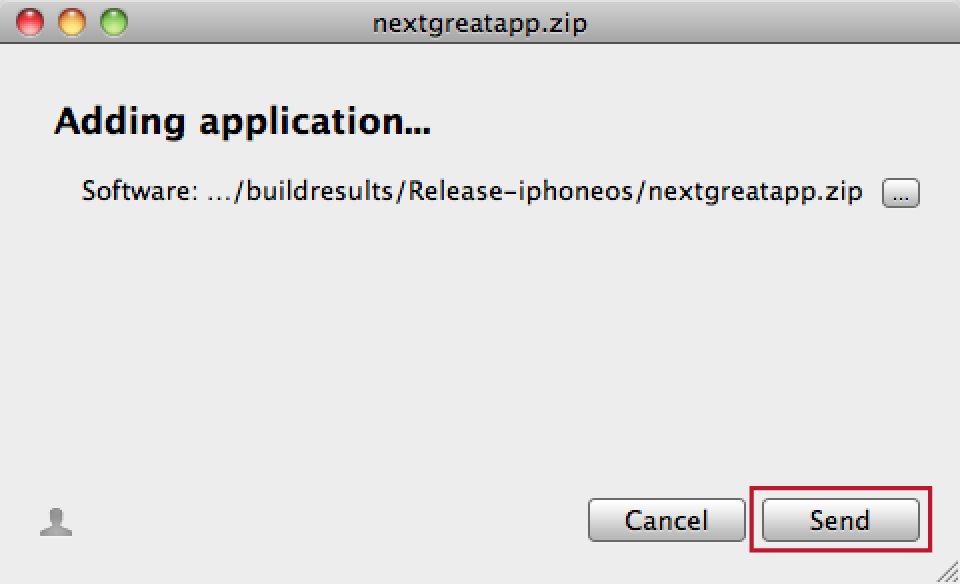
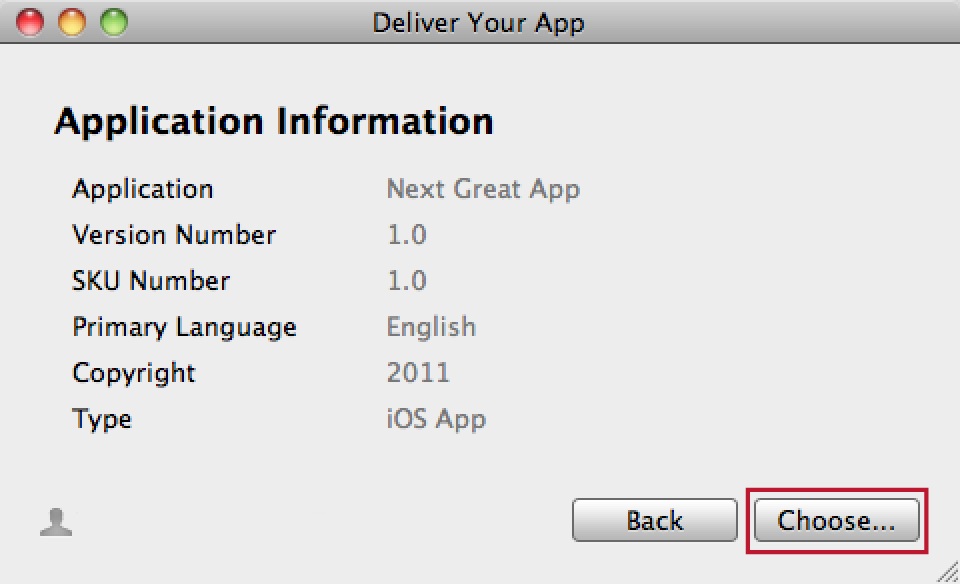
- Your Application Information will be displayed. Press the Choose button. Browse to your ZIP file, select it, and press Open.
- Once your archive is selected, press the Send button. The validation process will run and upon successful completion, your ZIP file will be uploaded to iTunes Connect.

- Press Done after your app has been uploaded to iTunes Connect. The status of your app record will change to either “Upload Received” or “Waiting for Review.”