Sidebar
uploading_photos
Table of Contents
Uploading Photos
Smartphones can be used to take photos with a ViziApps app, but ViziApps will also automatically handle the uploading of photos into Amazon S3 storage when you save a photo to a data source. Here's an overview of the photo-taking and upload process:
- Take a photo from your app.
- Upload the photo file to a data source.
- ViziApps uploads the photo file to your ViziApps account location in Amazon S3 storage.
- ViziApps enters the Amazon S3 URL for your photo as the actual data in your data source.
Configure A Camera Into Your App
Picture-taking functionality is built-in to smartphones and ViziApps, so all you need to do is request the phone's camera to be started. To incorporate a camera into your app, place any Button Field or Image Field button into your app, and select the “Take a photo” event.
After a picture has been taken, a new jpg file is created, so your app needs to store the location of this new file. This is typically done by placing a Hidden Field on the page with your camera field or button.
- In the Camera Field or button properties, set the Photo Image URL to the ID of your hidden field.
- You can also preset a compression ratio, where 1.0 is maximum quality and the largest file size, and smaller numbers provider greater compression at lower quality.
- Optionally, you can insert another Hidden Field or an Image Field if you would like a thumbnail copy of the photo for other purposes such as feedback to the user, or to upload as a different photo.
Upload The Photo
For any data source, such as Google Sheets, Intuit QuickBase, Salesforce.com, or SQL Databases, ViziApps will upload the URL to your photo's location in Amazon S3, rather than the actual file contents.
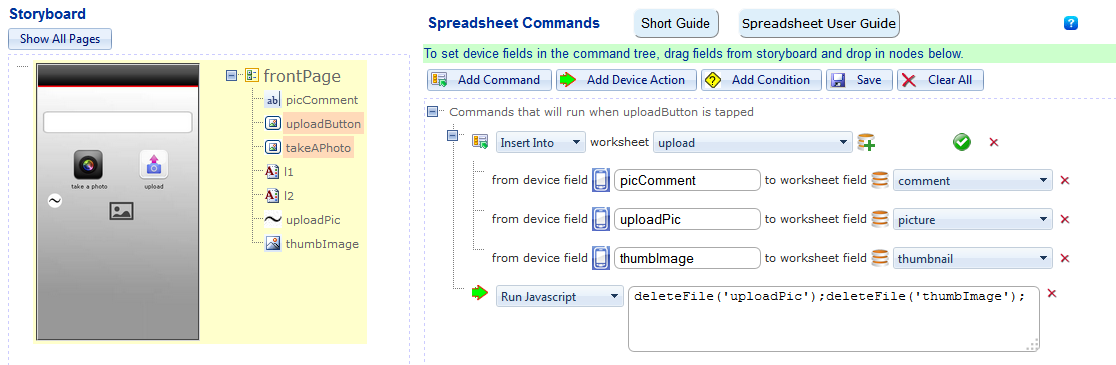
For your app page containing the Camera Button, open Manage Data and create a data command. See the Data Connections How-To Guide for more information on creating data commands. To specify the new photo file, insert the Hidden Field ID that holds the Photo Image URL as the device field in the data command.
Once uploaded, you can use the photo URL at any time, in any Web page or application, to access your photo.
Delete The Photo (optional)
For some applications, you may not want photos to remain on the user's device, so the easiest method is to automatically delete the photo file after the upload has completed. The following code can be inserted into your app's HTML Header to create a deleteFile() function:
<script src="https://s3.amazonaws.com/viziapps/apps/lib/field_helper_1.0.6.js"></script>
<script>
var FH = new v.fieldHelper();
function deleteFile( path )
{
    FH.deleteFile( path, function( file )
    {
        console.log( 'Deleted: ' + file );
    });
}
</script>
The action to deleteFile() is best called at the end of the data command that uploaded the file, as in the following: